Pages

Monday, April 30, 2012

Butterfly Happy Birthday Card

Sometimes the easiest cards to make are the ones with a recipient in mind.  I made this butterfly happy birthday card for my friend who has a birthday this week.  Her favorite color is purple and she loves butterflies. 

Supplies used:  Metallic card by The Paper Company (2009367), Purple Paisley patterned paper by Recollections, gemstone cardstock by Core'dinations in Pearl (GX-GEM200), white cardstock, Martha Stewart crafts butterfly punch, Spare•Parts paper flowers and brad by The Paper Studio (286070 & 661546), TPC Studios clear stamp (Greetings, ST93416), Hero Arts chalk ink in Iris,  and Recollections rhinestones.

Butterfly Happy Birthday Card Directions:
  1. Use ready made card.  Finished size: 4.375" x 5.75".
  2. Trim patterned paper and adhere.
  3. Punch butterflies, adhere to card, and adhere rhinestones.
  4. Stamp sentiment, ink edges, layer, attach flowers with brad, and adhere.

Sunday, April 29, 2012

Butterfly Just a Note Card


Aqua is one of my favorite spring colors, it has a cool and calming quality.  Pairing aqua with the butterfly seemed the thing to do.  Looking through my Stampin' Up! patterned paper I found just the inspiration needed to create the Butterfly Just a Note Card.  I hope you like it as much as I do.

Supplies used: Olive green cardstock, aqua cardstock, Everyday Enchantment patterned paper by Stampin' Up! (126154), Stampin' Up! Butterfly punch (117404), Stampin' Up! classic stampin' pad in Lucky Limeade (122935),  Stampin' Up! Butterfly Prints stamp set*  (120738), TPC Studios clear sentiment stamp (Greetings, ST93416), Creative Memories corner punch, Stampin' Up! dimensionals (104430), and Recollections rhinestones.

Butterfly Just a Note Card Directions:
  1. Make card from cardstock or use ready made card.  Finished size: 4.5" x 6.25".
  2. Trim patterned paper pieces and adhere.
  3. Stamp butterfly images, punch, and adhere with dimensionals or foam tape.
  4. Stamp sentiment, corner punch aqua paper strip, layer, and adhere with dimensionals.
  5. Adhere rhinestones.

*Just a note:  The Stampin' Up! Butterfly Prints stamp set will be discontinued the end of May.

Friday, April 27, 2012

Peacock Embossed Card


Heat embossing is one of my favorite ways to accent my handmade cards.  I do consider this an advanced technique.  So I went on You Tube and found a great instructional how to for heat embossing.  Just click this link if heat embossing is new to you.  The peacock embossed card is one of my favorite card creations.

Supplies used: Aqua cardstock, navy cardstock, light aqua cardstock, patterned paper by DCWV (Gone Wild stack, PS-005-00117), Hero Arts cling rubber stamp (Peacock, CG184), VersaMark watermark stamp pad, sentiment stamp by TPC Studios (Greetings, ST93416) Stampendous! Pearlustre embossing powder in Lapis (EP231),  Zing! embossing powder in Teal metallic (27165), Heat embossing tool by The Paper Studio, Offray aqua ribbon (sku #103676), and Recollections rhinestones.

Peacock Embossed Card Directions:
  1. Make card from cardstock or use ready made card.  Finished size: 4.5" x 6.25".
  2. Trim patterned paper and adhere.
  3. Stamp image using VersaMark, apply a small amount of teal embossing powder on tail area, tap  off.  Apply lapis embossing powder to the remainder of the image and heat emboss.
  4.  Stamp sentiment and emboss.  Layer image to sentiment cardstock, attach ribbon, and adhere.
  5. Adhere rhinestones, tie bow and adhere.

Stampin' Up! Mother's Day Card

Mother's day is quickly approaching with only two weeks left to make that perfect card.  I found my inspiration from card sketches from Paper Crafts Magazine on Pinterest.  Wherever you find your inspiration your mother is sure to love a handmade card.

Supplies used:  Ivory cardstock, patterned paper by Stampin' Up! (Ice Cream Parlor designer paper and quick accents pack, 122242), sentiment stamp by Paper Inspirations (F10521), Inkadinkado clear stamps (Floral Flourishes, 97633), dye ink pad in Royal Blue by Stampabilities, classic stampin' pad in Lucky Limeade by Stampin' Up!, buttons from the Ice Cream Parlor collection by Stampin' Up! (123612), thread and needle.

Stampin' Up! Mother's Day Card Directions:
  1. Make card from cardstock or use ready made card.  Finished size: 5" x 6.25".
  2. Trim border piece from quick accents and adhere.
  3. Trim patterned paper and adhere.
  4. Cut 4.25" circle, trim one edge, stamp flourish, and adhere.
  5. Stamp sentiment and adhere.
  6. Layer quick accents, stitch button, and adhere.

Thursday, April 26, 2012

Zinnia Flower Happy Birthday Card

Inspiration for a great card design is all around us.  Today's inspiration came from the many flowers starting to fill the yards with color.  The Zinnia is a wonderful summer flower and the Zinnia Flower Happy Birthday card is bright and cheerful.  I like to have several birthday cards on hand to give to family and friends.  This card makes a great addition to my stash.

Supplies used: White cardstock, pink cardstock, lime green cardstock, Sizzix Texture Boutique, Sizzix embossing folder (Flower Vine & Twizzle Set, 656799), Fiskars edge punch (Upper Crest), flower stickers by Martha Stewart Crafts (Dimensional Zinnia Stickers, M355004), Hero Arts clear stamp (Classic Messages, CL414), and Stampin' Up! classic stampin' pad in Lucky Limeade (122935).

Zinnia Flower Happy Birthday Card Directions:
  1. Make card from white cardstock or used ready made card.  Finished size: 4" x 5.5".
  2. Trim pink cardstock and adhere.
  3. Trim white cardstock, emboss using the Sizzix Texture Boutique machine, and adhere to card.
  4. Edge punch green cardstock strip, start with a strip 2.75" wide.  Layer with white cardstock and adhere.
  5. Adhere flower stickers, stamp sentiment, layer, and adhere.
This design would also work great for other sentiments, thank you, thinking of you, hello, and best wishes.  If you don't like Zinnia's pick another flower.  If you don't want to use stickers, stamp a flower image.  Making a few changes can change the look of the card.  Have fun!

Tuesday, April 24, 2012

Using Butterfly Dimensional Stickers

Butterflies alert us that winter is over and spring has arrived.  I love to watch them flutter around my backyard flowers.  One of the quickest ways to add interest to one of your handmade card creations is by using butterfly dimensional stickers.  My favorite stickers come from K & Company.  K & Company makes it easy for you to find coordinating products by giving their collections names.  Both cards in the photo were made using butterfly dimensional stickers as accents.  The card on the left used paper and dimensional stickers from the Julianne collection by K & Company.  The card on the right was a created using paper from The Paper Studio and dimensional stickers from K & Company.  I like making different versions of the same design just to see how the paper and colors make a difference in the design.    

Friday, April 20, 2012

With Deepest Sympathy Card

This last week a dear family friend and neighbor passed away.
Making a handmade sympathy card is a great way to express your condolences.     

Supplies used: The Paper Company ready made card (Brocade fashion colors, #P70146), sandstone cardstock, tan cardstock, light blue cardstock,  Bazzill  Basics cardstock in Nightwater  (7-7132), patterned paper by The Paper Studio (Blue & Brown Paisley, #153783), Cricut Machine and Straight from the Nest cartridge, Stampin' Up! Blossom Punch (#125603), 3/4" and 1" circle punches, sentiment stamp by Stampabilities (With Deepest Sympathy, #FR1124), ColorBox chalk ink pad in Chestnut Roan, Copic Marker (Dark Suntan, E15), and Recollections rhinestone.

With Deepest Sympathy Card Directions:
  1. Trim patterned paper, ink edges, and adhere to card.  Finished size: 4.75" x 6.5".
  2. Trim cardstock strip and adhere.
  3. Stamp sentiment on cardstock, ink edges, and adhere.
  4. Cut out and punch flower pieces, ink edges of tan flower and circle, layer, and adhere.
  5. Adhere rhinestone.

Wednesday, April 18, 2012

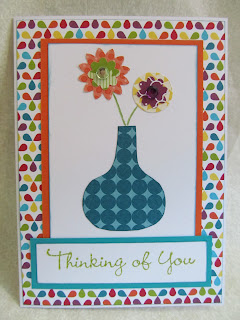
Summer Smooches Thinking of You Card

The bright fun colors of the Summer Smooches paper collection by Stampin' Up! made it easy to come up with this design.  I used one of their stamps as the inspiration for the focal point.  Since all the colors coordinate beautifully you could mix the patterns however you like.  The Summer Smooches Thinking of You card is perfect for that special someone who needs a little cheering up. 

Supplies Used: White cardstock, Summer Smooches patterned paper by Stampin' Up!, orange cardstock, teal cardstock, TPC Studios clear sentiment stamp (Greetings set, ST93416), ColorBox Cat's Eyes chalk ink pad in Prussian Blue, Stampin' Up! dye ink pad in Lucky Limeade, Stampin' Up! 3/4" circle punch and Boho Blossoms punch, Crayola colored pencil in Jade Green, scissors, and Jolee's Bling dimensional stickers (multi color gems, 50-50439).

Summer Smooches Thinking of You Card Directions:
  1. Make card from cardstock or used ready made card.  Finished size: 4" x 5.5".
  2. Trim patterned paper, ink edges, and adhere.
  3. Trim cardstock pieces and set aside.
  4. Fussy cut vase, ink edges of vase, punch circle and flowers, adhere to cardstock and then draw stems; ink edges of cardstock, layer, and adhere to card.
  5. Stamp sentiment, ink edges, layer, and adhere.
  6. Adhere gems.

Monday, April 16, 2012

Thanks So Much Card

Card designs can be simple but still full of bling and pizazz.  The Thanks So Much card design turns an ordinary tag into a burst of floral thankfulness.  I'm not a fan of pink but the majority of my customers love it so I try to remember to cater to what the recipient likes.  Although when I make this card again I will use a teal cardstock for the sentiment. 

Supplies used:  White cardstock, light tan cardstock, pink cardstock, Random Collection patterned paper by Crate Paper, Cricut machine and cartridges (George and Basic Shapes, Stamping, and Straight from the Nest), Xyron create-a-sticker, Spare Parts paper flowers by The Paper Studio, Spare Parts gemstone brads by The Paper Studio, aquamarine ink from ColorBox Cat's Eye ink stack, ribbon by Offray, Recollections rhinestones, and Sticky-Doos by The Paper Studio.

Thanks So Much Card Directions:
  1. Make card from cardstock or use ready made card.  Finished size: 4" x 5.5"
  2. Trim patterned paper and adhere.
  3. Cut flower design, tag, and sentiment with Cricut machine.
  4. Ink edges of flower design and adhere.
  5. Ink edges of tag, send sentiment through the Xyron create-a-sticker, and adhere.
  6. Tie ribbon onto tag, layer flower and rhinestone brad and attach to tag, adhere tag with sticky-doos or foam tape and adhere rhinestones.

Sunday, April 15, 2012

Pink Zebra Mother's Day Card

If your mom is hip and cool and you need a Mother's Day card to reflect that, then you are sure to love this Pink Zebra Mother's Day card.  This design is very simple to duplicate because it doesn't take any special tools or punches to create.  All supplies were purchased from either Hobby Lobby or Michaels.

Supplies used: Recollections black folded card, patterned paper by The Paper Studio (Pink & Black Zebra, #184069 & Texture- Light Pink, #686683), white cardstock, sentiment stamp by Paper Inspirations (#F10521), Colorbox chalk inkpad in Blackbird, Recollections black glitter tape, and glitter flower brad from Spare Parts set by The Paper Studio (#661256).

Pink Zebra Mother's Day Card Directions:
  1. Trim patterned paper, ink edges, and adhere to card.
  2. Trim white cardstock and pink paper, ink edges (optional), and layer.
  3. Stamp sentiment and adhere.
  4. Trim glitter tape, cut small hole for flower brad, peel backing off of glitter tape, attach flower brad, and adhere to card.
P.S. This card also makes an awesome birthday design!!!

Friday, April 13, 2012

Mother's Day Bird Card

This card is perfect for a mother who loves birds.  The design is simple but the bird focal point really makes this card special.  The bird punch and stamp set used is from Stampin' Up!  Being a bird lover myself this was one of the first things I purchased from Stampin' Up!  If you decide you must have it click on the link provided to browse their website.

Supplies used:  Tan cardstock, cream cardstock, Random Collection designer paper by Crate Paper (#RD989),   Stampin' Up! Bird  Builder punch  (#117191)  and  Language  of  Friendship  stamp  set   (now discontinued), ColorBox Cat's Eyes dye inkpad (Coffee House collection, colors used: Cookie Dough, Dark Cherry, and Atlantic Blue), ColorBox chalk inkpad in Chestnut Roan, Hero Arts sentiment stamp (#C2962), Cricut machine and Cricut Straight from the Nest Cartridge, Xyron Create-a-Sticker, and Sticky-Doos from The Paper Studio.


Mother's Day Bird Card Directions:
  1. Make card from cardstock or use ready made card.  Finished size: 4.75" x 6.5".
  2. Trim denim patterned paper, ink edges, and adhere.
  3. Trim accent patterned paper 2" x 2.75" each, ink edges, and adhere.
  4. Cut out or punch scalloped design, ink edges, stamp and punch bird pieces, use Xyron create-a-sticker on bird pieces.
  5. Position the branch and adhere, stamp bird feet, and adhere bird body.
  6. Stamp sentiment, ink edges, and adhere with sticky-doos or foam tape.

Thursday, April 12, 2012

Handmade Mother's Day Card

Mother's Day is Sunday May 13, 2012.  This gives us one month to create the perfect handmade Mother's Day card.  The rose is a wonderful symbol to do just that.  I love how a rubber stamp and a few markers can turn a stamped image into a work of art. 

Supplies used: Recollections pink folded card, Madeline Collection patterned paper by Prima Marketing, white cardstock, aqua cardstock, Cricut machine, Straight from the Nest Cricut cartridge, Inkadinkado rose stamp (#90575), Hero Arts sentiment stamp (#C2962), Craft Smart dye ink pad, Copic Markers (Dark Pink RV34, Rose Mist R83, Sea Green G12), and Recollections rhinestones.

 Handmade Mother's Day card Directions:
  1. Trim and adhere patterned paper.
  2.  Cut a 3.5" background design with Cricut machine, or use a die cut shape or punch of your choice.
  3. Stamp and color image, ink edges with marker, layer, and adhere.
  4. Stamp sentiment, ink edges with marker, layer, and adhere.
  5. Adhere rhinestones.


Tuesday, April 10, 2012

50% Off Adhesive Gemstones

It's the small things which sparkle that can add dimension, texture, and pizazz to your cards.  The deal I found this week is 50% off adhesive gemstones from The Paper Studio at Hobby Lobby.  There have been many times that I wanted more gemstones or rhinestones to choose from in my craft stash.  This week I added a rainbow of colors and some great jeweltones, now I have more to choose from.  The 50% off adhesive gemstones promotion runs through April 14, 2012.

Monday, April 9, 2012

Herringbone Thank You Card

The Random Collection by Crate Paper has sparked several creative card making ideas.  The herringbone thank you card design can easily become a birthday or mother's day card.  Let your imagination guide you.  With the paper choices in the random collection you simply can't go wrong.

Supplies used:  White cardstock, black cardstock, Random Collection 6 x 6 designer paper pad by Crate Paper,  Martha Stewart edge punch, Copic marker (RV19, Red Violet), Inkadinkado clear stamp (#97633 Floral Flourishes), Stampabilities rubber stamp (#D1200 Thank You Circle Seal), ColorBox chalk ink in Blackbird, and black rhinestones by The Paper Studio (#613976).

Herringbone Thank You Card Directions:
  1. Make card from cardstock, finished size 4" x 5.5" or use ready made card.
  2. Trim, ink edges, and adhere herringbone patterned paper.
  3. Punch patterned paper strip, trim patterned paper piece, ink edges with marker, and adhere.
  4. Stamp flourish on patterned paper and adhere.
  5. Cut or punch circles, stamp sentiment, layer, and adhere.
  6. Adhere rhinestones.

Sunday, April 8, 2012

Crate Paper Thank You Card

The right paper makes every card project better.  I'm in love with Emma's Shoppe Collection by Crate Paper.  I purchased the 6 x 6 designer paper pad from Sooner Scrapbooks in Tulsa, OK.  The Crate Paper Thank You card features six different paper patterns from the paper pad.  You could mix any of the coordinating papers together with beautiful results.

Supplies used: White cardstock, Crate Paper 6 x 6 Emma's Shoppe Collection designer pad (#ES868), Fiskars edge punch (upper crest), EK Success butterfly punch, TPC Studios clear stamp (Greetings set, ST93416), ColorBox chalk ink in Chestnut Roan, Copic marker (Dark Suntan, E15) and Sticky-Doos by The Paper Studios.

Crate Paper Thank You Card Directions:
  1. Make card from cardstock, finished size 4" x 5.5" or use ready made card.
  2. Measure and trim three coordinating patterns, tape together and adhere to top of card.
  3. Trim bottom patterned paper and adhere.
  4. Edge punch accent paper, ink edges with marker, and adhere. 
  5. Punch butterfly, ink edges with marker, and adhere with sticky-doos or foam tape.
  6. Stamp sentiment, ink edges, layer, and adhere.

Saturday, April 7, 2012

Adhesive Tape Runners

When I started card making one lesson I learned was not all adhesive tape runners are created equal.  There are many choices and brands on the market and the quality and adhesive power vary greatly.  So let me share with you the brands of adhesive tape runners that are my crafting staples.  My first choice for card making and scrapbooking is Scotch adhesive dot roller.  It is very easy to use on curved and straight areas, it has a strong permanent bond, and refill cartridges are easy to change and saves you a little money.  I use this for the majority of my card making projects.  When I need an extra powerful bond I use The Craft Collection adhesive power bond by Tombow.  It has an extra strong permanent bond for heavyweight papers, cardstock, and embellishments.  The Craft Collections mono adhesive tape runner is perfect for lighter weight papers and scrapbooking projects.  I hope you find this useful.  Happy crafting!

Thursday, April 5, 2012

Card with Paper Flowers

On a recent shopping trip I stocked up on paper flowers.  Today's card with paper flowers incorporates my new supplies beautifully.  The completed design is a simple savvy handmade card.

Supplies used:  Cream card from The Paper Company (Buttercream Frosting fashion colors, item #P70159), patterned paper by K & Company designer mat pad (Sweet Nectar, 30-657083), Starburst Lichen Metallic paper by The Paper Studio (item #976563), Cream cardstock, corner punch, Paper Flowers by The Paper Studio (item #286047), rhinestone brads by The Paper Studio (item #661454), acrylic stamp by TPC Studios (Greetings set, ST93416), Stampin' Up! classic stampin' pad in Pool Party, and small hole punch.

Card with Paper Flowers Directions:
  1. Trim patterned paper and adhere to card.
  2. Trim metallic and patterned paper, corner punch, punch holes, place flowers with rhinestone brads, and adhere.
  3. Stamp desired sentiment, ink edges, layer, and adhere.

Wednesday, April 4, 2012

Happy Birthday Cricut Card

Several years ago my husband bought me a Cricut machine for Christmas.  Through the years I've used it to enhance my scrapbooking and card creations.  The card I made tonight features cut-out designs using the Cricut machine.

Supplies used: Cricut machine, Cricut Cartridges (Straight from the Nest and Stamping), Kaiser blank card (EF020 - Metallic Blue), patterned paper from K & Company designer mat pad (Julianne 30-657113), dark metallic blue cardstock, white cardstock, blue dusk cardstock, corner punch, ColorBox Cat's Eye dye ink in Atlantic Blue, and Recollections rhinestone.


Happy Birthday Cricut Card Directions:
  1. Trim patterned paper, ink edges, and adhere.
  2. Trim cardstock pieces, punch corners, ink edges, layer, and adhere.
  3. Use Cricut machine to cut out selected design and sentiment.
  4. Adhere designs, sentiment, and rhinestone.

Monday, April 2, 2012

Easter Chick Card

The majority of cards I make end up going to my nieces.  This Easter chick card was made for my youngest niece. I tried to keep the tools to a minimum so it would be easy to duplicate.  Switch out the scalloped edge punch for one you have on hand.  Don't like the chick?  Use a bunny instead.  The design can be modified to suit the products you have.

Supplies used:  Recollections yellow folded card, purple cardstock, orange cardstock, white cardstock, patterned paper by The Paper Studio (Easter Bunny Word Mix, #984484), Fiskars scalloped edge punch, ColorBox chalk ink pad in Lavender, Jolee's boutique dimensional stickers (Baby Chicks, 50-20535), Copic marker (Yellowish Green, YG06),  and purple gel pen.

Easter Chick Card Directions:
  1. Punch scalloped edge and adhere to card.
  2. Trim patterned paper, ink edges, and adhere.
  3. Trim cardstock pieces, color grass on white cardstock, layer, and adhere.
  4. Attach chick and egg stickers and write "tweet tweet".
  5. Optional, stamp sentiment inside.

Rubber Stamp Clearance

Clearance styles I saw at Michael's.  *Styles may vary by location.
It looks like it's rubber stamp clearance time.  While shopping at Michael's and Hobby Lobby I noticed a large amount of rubber stamp inventory marked down on clearance.  This week Michael's has 40% off Recollections punches and trimmers and Hobby Lobby has a 40% off Blow-Out sale on The Paper Studio and Stampablities products.  Click links for details.  Happy shopping!!!